Showing posts with label savoury. Show all posts

Saturday, 22 October 2016

Braised sweet potato or squash


It’s the season for them, so here’s a simple way of jazzing up cucurbits or other starchy veg.  The slower cooking and the addition of oil, garlic and herbs really enhances the flavour of these autumn staples.
Serves two to three as a side dish. 

1 medium butternut squash or a quarter of a large pumpkin, or 2 large sweet potatoes, peeled and thinly sliced
2-3 cloves garlic, crushed or thinly sliced
Veg oil
A little stock
1 tsp mixed dried herbs or 1 tbsp chopped fresh mixed herbs
1 tbsp mixed seeds or 1 tbsp tahini as a topping

Very simple; pour a little oil into a large saucepan with a lid, heat gently and add the sliced sweet potato or squash, laying the pieces flat in layers.  Strew garlic and herbs between the layers and over the top, then pour on just enough stock to come round the edges, and simmer for 10-15 minutes or until the veg pieces are cooked and tender.  Keep an eye to make sure the pan doesn’t cook dry.  Serve hot with mixed seeds sprinkled over or a spoonful of tahini on top.

Monday, 15 August 2016

Braised veg with apple


We have an apple glut at the moment.  My landlady's garden is home to a tall apple tree and this year the crop is tremendous.  Every morning there are windfalls on the lawn, and we're both hunting for ways to use them up. 
A lot of chutney has been made, and blackberry and apple jam - I'll post some recipes for those shortly - and apple cake.  And tonight I invented this.
It's a kind of spin on the classic way of cooking red cabbage, but with different cruciferae (because this was what I had in the fridge) and more apple than usual.  This would serve two as a main veg dish alongside something like vege-bangers, pan-fried halloumi or grilled fish.

2-3 windfall eating apples, cored but not peeled, and chopped
1/2 a head of broccoli, chopped
1/4 of a white cabbage, thinly sliced
2 cloves garlic, minced
1/4 pt vegetable stock
Paprika and black pepper

Cook the broccoli in the stock for 5 minutes, then add the chopped apples, cook for a couple more minutes and then add the cabbage, garlic and seasonings.  Stir frequently and cook until the apple has gone to a mush and the cabbage is cooked through.  Serve hot.

Tuesday, 19 April 2016

Broccoli with cashews

A really simple quick steam-fried dish using green veg, with a good amount of protein from the nuts.  This would also work with cauliflower florets, spring greens or savoy cabbage - personally I'm not a big kale fan but I'm sure that would be okay too!  Vegan and gluten-free, but (obviously) not nut-free.  Good as a veggie side dish with dhal and rice, or on its own; any leftovers are equally good cold served as a mildly spicey salad or rolled in a flatbread with some cooked tofu or quorn or pan-fried halloumi cheese.

For two as a light main dish or four as a side

One medium head of broccoli, broken into fairly small florets
1 cup whole or broken cashew nuts
1 small onion, finely sliced
6-8 cloves garlic, finely chopped or crushed
Veg oil
2-3 tsp garam masala
1 tsp paprika
Juice of a lemon
Tamari soy sauce
Water

In a large wide frying pan, heat the oil and fry the onions on a medium heat until softened and just starting to catch a little; add the garlic, cook for another minute or so and then add all the broccoli.  Stir thoroughly to mix and raise the heat slightly, cook four to five minutes, stirring frequently.  Add the cashews and the spices and stir through; cook a few minutes more, stirring constantly; don't allow the cashews to burn (a bit of colour is okay but no more).  Add the lemon juice - it should hiss and give off a fair amount of steam - and continue to stir; when that has evaporated, add the tamari and a little water and continue to stir.  Continue stirring and adding small amounts of water (approx 1 tbsp at a time) until the veggies are cooked but not gone mushy.  There should be just a little liquid left at the end.


Thursday, 7 April 2016

Giant baked beans

If you've ever seen the above - or just "baked beans", or the even more blunt "big beans" - on a translated menu while on holiday in Greece, and you've avoided what sounds like a rather boring item, you've been missing a trick.  Fasolia gigantes, literally giant beans, are one of the joys of Greek cuisine, and they are nothing like our familiar Heinz Baked Beans, nor indeed the Boston Baked Beans those originally derived from.  They're a classic piece of "peasant" cooking; simple, wholesome, gluten and nut-free, and not just vegetarian but vegan; they're also easy to make, very tasty and highly diabetes-friendly.  Beans give a decent amount of vegetable protein and a reasonable amount of low-GI carbohydrate, set-off with plenty of fibre for your digestion. 
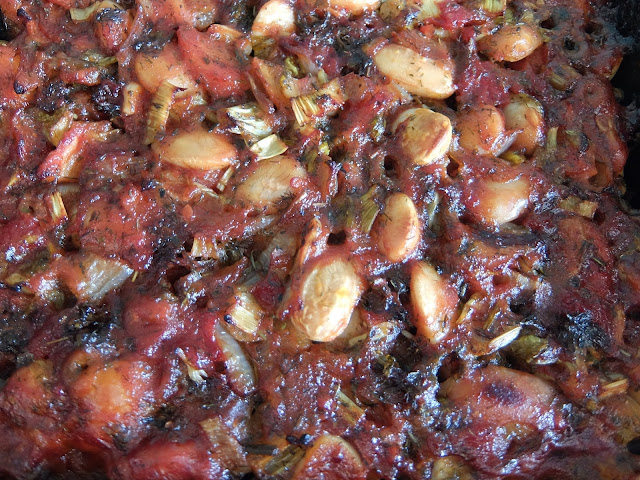
Giant Baked Beans, or Gigantes Plaki, fresh out of the oven

Unfortunately, I've never found them on sale in this country except as canned or (slightly posher) bottled versions, ready cooked.  These are okay, with a taste evocative of holidays.   But the real thing, cooked at home from the basics, are much better.  These days I bring a bag of dried fasolia gigantes back religiously from holiday each spring, so I can make my own Gigantes Plaki, giant baked beans.

Edited, 28/5/16, to add: I have now discovered at least two companies importing gigantes, hurrah!  here is one of them: https://greekmarket.co.uk/index.php/greek-groceries/greek-beans-grains.html

Gigantes look a bit like butter beans, but butter beans that have been working out; they are thick and beefy-looking, and they have a meaty texture and slightly sweet taste.  They're not the cheapest bean but they're worth the extra money.  If you do buy a bag on holiday and bring them home, try to use them up within 9 or 10 months maximum.  Don't hoard them; I've made this mistake, and found that like any dried pulse they go stale after they've been open for a while, and then won't cook properly.  I wound up throwing the last 1/4 of the bag away and feeling thoroughly cross with myself.

This is one of those dishes where every family which likes them is probably going to have their own variation on the recipe.  I've evolved mine from adopting things that seem to me to work well; it's quite variable so don't be afraid to tweak it to suit, for example, what herbs you've got.  The recipe can also be made with any other good dried beans, of course; borlotti beans are flavoursome enough and so are kidney beans (amend the cooking time if so, as gigantes are surprisingly quick to cook).  But though that will give you a very good simple bean stew, it won't be authentic gigantes.

1/2 lb/ 200-250g dried fasolia gigantes, rinsed, checked for grit and soaked overnight
1 large onion, chopped
Vegetable oil and olive oil
1 can chopped tomatoes
3-4 cloves garlic, sliced finely
1 dessertspoonful dried oregano
1 large carrot, sliced
1 heaped teaspoonful dried dill
1 small bunch fresh parsley, chopped
1 small bunch fennel leaves, chopped
Optional - a couple of handfuls of spinach or a couple of stems of celery, chopped, plus leaves
Black pepper, tomato puree, stock powder, (optional) a little cinnamon

Put the beans in a saucepan, cover with fresh water and bring to the boil.  Boil hard for ten minutes, then simmer for 30-40.  They should still have a bit of solidity at this stage, so don't cook until they are completely soft - they've still got almost an hour of cooking to go.  Slice the onion and fry until golden in a tablespoon or so of ordinary vegetable oil; after 5 minutes or so, add the carrot, garlic and all the dried herbs, some pepper, plus the celery and cinnamon (if using).  Continue cooking for another 5 minutes, then add the tomatoes, a dessertspoon or so of tomato puree and a teaspoon of stock powder, and the fresh herbs.  Simmer for another 5 minutes until thick and rich, add the spinach (if using), stir in and allow to wilt.  Add the beans and a little of their water and stir all together quickly.  Pour into an ovenproof dish or a deep baking tin.  If the beans aren't covered by the sauce, add a bit more of the water.  Pour a slug of olive oil on top and sprinkle with a little more oregano.  Cook in a medium oven (Fan 150 degrees, gas 4 or so) for 45 minutes to an hour.  Serve hot or cold.  This should be enough for two people as a main dish or three to four as a starter or side dish.


Tuesday, 8 December 2015

Low-carb short-crust pastry - first attempt

I've been meaning to have a go at inventing a pastry recipe for ages.  Last night I had a try, and the results were surprisingly succesful  There's room for improvement, texture-wise, and it isn't gluten-free; but it is high-fibre and low-carb (about half the carb load of regular pastry) and it made a perfectly acceptable shell for a quiche, so overall I feel that's a good start.

Ingredients

3 oz/ 75g/ 3/4 cup No 1 baking mix (recipe for that is here)
3 oz/ 75g/ 3/4 cup wholemeal flour (I'm using spelt at the moment as I like the flavour)
3 oz/ 75g butter
Cold water

Method

Method starts pretty much as normal.  Seive the flour, mix thoroughly with the baking mix and rub in the fat quickly and lightly till the mixture resembles breadcrumbs.  Add enough cold water, splash by splash, to bind the mixture together and gather it into a ball.

This is where things stopped being normal.  The lack of gluten in the baking mix meant the dough didn't have the same ability to stick together as a regular short-crust pastry would.  It took more water than a regular pastry recipe before I has a mix that would bind at all.  But then the very different kind of stickiness of the milled linseeds in the baking mix started to react to the water, and the dough suddenly became quite odd in texture - the least-unpleasant word I can find for it is slippery - and turned a rather unappetising greyish colour.

I looked at this and thought various less-polite forms of "oh bother".

I'd already prepared my quiche filling (1 onion, cooked in a little veg oil, mixed with 1 chopped fresh tomato, 2 eggs, 3 oz/ 75g grated strong cheddar, some milk, salt and pepper and 1 tsp wholegrain mustard), so I figured I'd better do my best with this mixture, and try again another time to get something that looked and behaved more like conventional short-crust pastry.  I was anticipating eating something leathery in the extreme, though.  Still, all food is food (sometimes in the world of experimental cookery you have to say this to yourself!).

I slapped a sheet of baking parchment into the tin, in case that rather wet mixture decided to stick, and then I tipped the mixture onto this, and smoothed it out and pushed it up to the sides by hand.  As the linseeds continued to absorb more of the moisture, the mixture seemed to grow stiffer and less slimey, and I was able to get a rather rough and untidy-looking case shaped.  I poured in the filling, topped it with a bit more grated cheese and stuck it in the oven at 150 degrees C (it's a fan oven by the way).

35 minutes later I took it out, and discovered that despite my worries I'd produced a perfectly succesful, robust, tasty pastry case.


I'd eaten half before I thought to take the photos...

Because the pastry was rather wet and slippery when made, I can't see how this would work for the kind of recipes where it needs to be rolled out and cut. I need to work out how to arrive at a result that is firm and holds its shape enough to treat conventionally like that.

But until it came out of the oven I fully expected to end up with a supper that tasted as if it was made of plasterboard.  So to end up with a pastry case that was crisp and flavoursome, kept its shape, and held a standard quiche filling without leaking, pleased me no end.

I'll be working on improvements to the texture and will report any successes here.

Monday, 26 October 2015

Sugar-free garlic & chilli dipping sauce

Last Friday evening I had an overwhelming craving for a Chinese takeaway.  Of course, unlike Chinese home cooking, your average Chinese takeaway is pretty high in starch and sugar, and certainly not diabetic-friendly.  Compromise; a packet of veggie spring rolls from M&S, and some prawns which I marinaded and stir-fried.  And to replace the wildly sugary commercial sweet chilli sauces I cooked up my own.  The flavours aren't remotely authentic (it's more of an asian-hispanic fusion) but it's incredibly simple to do and pleasantly spicy, and it does the job.  Low-carb, low-calorie, and gluten-free unless you do the oatbran version.

1 medium tomato, finely chopped
2 tsp Marigold stock powder
1/2 cup boiling water
1 tsp mild smoked paprika
1/2 tsp chilli powder
2 cloves garlic, crushed or v finely chopped
3-4 tsp tamari
1-2 tsp cornflour or oatbran

Mix all the ingredients except the cornflour together in a small pan and heat for about two minutes, stirring.  Add a small amount of cold water to the cornflour to make a paste, stir into the tomato mixture and cook just until it clears and thickens.  Decant into a small bowl and get dipping those prawns!

Can also be made in a small bowl in the microwave; cook in 30 second bursts and stir between times.

If using oatbran (lower GI but obviously not gluten-free), add this by sprinkling it in slowly directly into the sauce; no need to mix to a paste first.  It may need slightly longer to cook afterwards and won't be a clear sauce, but will thicken just fine.

Thursday, 30 July 2015

As promised, Eggy Bread Variations...


Two bits of real comfort food, ideal for using up that slightly-elderly bread I was talking about a couple of days ago.  I assume you're already up on basic eggy bread (aka French toast). 

Bread frittata

This is one of those recipes that isn’t really a recipe, so much as a method for dealing with whatever you’ve got to hand.

Per person, you’ll need 2-3 eggs, beaten, a slice or two of stale bread crumbled up fairly small, and some chopped cold cooked vegetables – fried onions are terrific – and/or the kind of fresh veg that cook quickly (e.g. sweetcorn kernels, chopped-up tomatoes or canned pulses of some kind).  Plus grated or cubed cheese if you’re a cheese eater, and plenty of seasoning.  If you eat meat, something like chopped ham or corned beef would go well too.

Mix the whole lot together and let it sit in a covered bowl for at least thirty minutes, longer if possible.  Then heat a frying pan with a small amount of vegetable oil until pretty hot, as though you were going to make an omelette.  Tip in the mixture and level it out, then turn the heat lower.  Cook until set; if need be either finish the top under a hot grill or turn it out onto a plate and flip it over as you return it to the pan, to cook the other side.  Serve hot.

Eggy bread toastie sandwich

This is particularly good with “sandwich loaf” bread like Genius bread.

For each person, you will need:
2 slices of bread
2 eggs
Vegetable oil

Plus a choice of one or two of
Feta or some other cheese
A sliced tomato
Some flaked canned fish
A slice of ham
Some stoned olives, chopped roughly


Beat the eggs thoroughly with some pepper and pour over the sliced bread in a flat dish.  Leave to soak for half an hour minimum.  Sandwich the two slices of soggy eggy bread with your choice of filling(s) and press down hard. 

Heat a small amount of oil in a frying pan; get it good and hot to start with.  Pick up your gooey egg-soaked sandwich and slip it into the hot oil.  Fry for five minutes on a fairly high heat, then turn the heat down to fairly low.  Turn the sandwich over carefully with a spatula.  Continue cooking on the other side.  You’ll need to turn it two or three times altogether; gently does it each time.  The idea is never to let it burn but to get all the egg cooked and the filling thoroughly heated through and/or melted.  Serve hot.